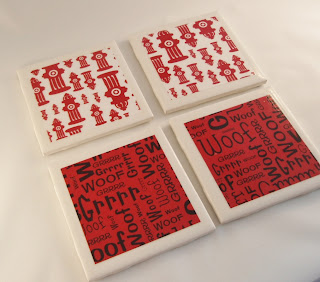
Lets face it, between the Holidays, Birthdays, Anniversaries, and other special events gift giving has lost it's personal touch. I prefer making personalized gifts for friends and family and I feel like it means a lot more than something I picked up at Wally World or Target. It could also have something to do with the fact that I do not have a Wally Wold or Target anywhere near me but I digress--
So, here is a simple tutorial on a personalized gift for just about anyone. Keep in mind this does not have to be pet themed. You can personalize this for anyones intersts.
What you will need:
-4 tiles
-fancy paper cutter (or scissors and a ruler)
-scrapbook paper or a picture
-mod podge
-diamond glaze
-2 small foam craft brushes
-toothpick or needle
-toothpick or needle
To start out you will need to get your scrap book paper and cut it into 4 squares that are 3.5 inches by 3.5 inches. This is the perfect size for these tiles so it leaves a bit of the natural border and "frames" paper.
plain tile squares ready for decorating!
Paper is cut! 4 squares all 3 1/2 inches by 3 1/2 inches.
Just center your square and...Perfect!!
The next part is VERY IMPORTANT! The last time I made some of these I had "helpers" and these helpers were shedding their hair into my work space.
Before you mod podge make sure your area is clear of hair, fuzz and other small things. If the hair gets into the mod podge it makes a mess to get out or it will dry in there and look tacky. So... no 4 legged helpers on this project- sorry!
Now you will need to get out your Mod Podge and foam brush. Set one tile in front of you and put a thin layer of Mod Podge on the your tile and place the paper square in the center of it.
You will have to let each tile dry before moving to the next step so it is best to do one at a time and work in an assembly line fashion. Once all the glue is dry on each tile you can then put a thin layer of Mod Podge on each tile. Make sure to seal around the edges and make the Mod Podge as even as possible.
When applying the Mod Podge it is best to make the coats thin. It will dry faster and it will decrease the possibility of soggy paper and air bubbles. If you do get air bubbles you can pop them with the end of a toothpick or the corner of your foam brush.
Once you have applied about 4 coats of Mod Podge on your coasters you will want them to dry completely and then you can apply your Diamond Glaze. You can check to see if they are dry by lightly touching a corner of the coaster. If it is tacky you will need to let it dry a little longer. I let mine sit for about an hour just to be on the safe side. Once the Mod Podge dries it is a matte finish so you can go a step further and use the Diamond Glaze to give a glossy finish to your coasters.
To start the diamond glaze process you will need to get a clean foam brush, Diamond Glaze and to lay all your coasters out. Make sure they are free of dust and fur! I pour a small amount of glaze (about 2 tablespoons) on a coaster and use the brush to spread it around in an even layer. Make sure the glaze coats the coaster on all edges.
As you can see below the Diamond Glaze sometimes gets air bubbles. You can use the edge of the brush to pop them or you can use the end of a toothpick or needle.
Once you have the glaze applied on all the coasters it is best to let them dry for about 24 hours. Set them somewhere where they will not be disturbed.
After they are dry you will need to apply the backing on each coaster. I am using felt stickers used for cabinets to keep them from slamming and scratching. You can also glue a felt square on the back. Basically anything to keep the stone coaster from scratching furniture or scratching each other when they are stacked together.
Peel off the stickers and place a square in each corner.
Now that you have added the backing they will be safe to stack on top of one another.
The last step is up to you! I added some decorative ribbon I found at the dollar store, but you can add solid ribbon or anything else you have around the house.
And here you are! An affordable, personal gift for your pet loving friends!
Here are some more examples of coaster I have made. You can use different scrapbook paper, stamps, or even photos!
Here I used stamps and left the coasters natural and unfinished. The two below are with scrapbook paper and I used the same concept as the tutorial above.
Have Fun!!!


At Airvets, we provide door to door pet transportation services for your special family member.Call us at (972)591-1342 and let us help you take the stress out of shipping your pets.
ReplyDelete